
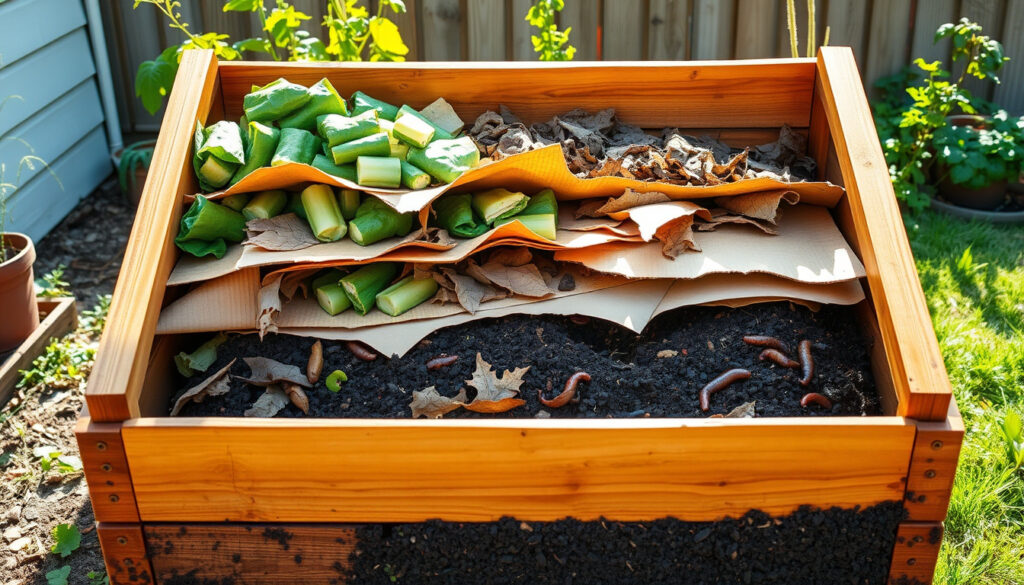
Composting transforms everyday kitchen and garden waste into nutrient-rich soil amendment that benefits both your garden and the environment. Yet success depends on understanding what belongs in your pile and what should stay out. This guide covers the essential do’s and don’ts that help home composters avoid common pitfalls and build healthy, productive compost systems.
Whether you have a sprawling backyard or a modest apartment balcony, the same fundamental principles apply. Getting the balance right between moisture, materials, and management determines whether your compost breaks down efficiently or becomes a smelly, sluggish mess. The good news is that mastering these basics takes less effort than most beginners expect.
What Should You Put in Your Compost Pile? (Essential Do’s)
A thriving compost pile requires two main ingredient categories working together. Nitrogen-rich greens fuel microbial activity, while carbon-rich browns provide structure and aeration. Maintaining a 2-3:1 ratio of browns to greens by volume creates optimal conditions for decomposition according to sources like the EPA and Healthline. Chopping materials into smaller pieces accelerates the breakdown process significantly.
Greens include:
- Kitchen scraps such as produce trimmings—onion skins, apple cores, banana peels, and potato peels
- Coffee grounds and used tea bags
- Fresh grass clippings and green garden prunings
Browns include:
- Dry leaves, straw, and sawdust
- Cardboard and newspaper
- Twigs, branches, and wood chips
Begin with a 4-8 inch base layer of bulky browns like twigs or wood chips to ensure proper aeration and drainage. Then alternate layers in lasagna fashion, adding water to keep the mixture moist like a wrung-out sponge. This layering technique promotes airflow throughout the pile while preventing compaction that slows decomposition.
The ideal compost pile maintains a 2-3:1 ratio of browns to greens. Greens provide nitrogen that fuels microbial growth, while browns supply carbon that supports structure and airflow. Too much green causes smelly, wet conditions; too much brown slows decomposition significantly. Aim for moisture levels similar to a damp sponge—wet enough to squeeze out a few drops but not dripping.
Choosing the Right Composting Container
The size and type of container affects how well your compost breaks down. Build your pile at least 3x3x3 feet to retain enough heat for efficient decomposition. Bins can be plastic cylinders, tumblers, wire mesh, or cinder blocks—each offers different advantages. Tumbler models make turning easier, while wire mesh provides excellent ventilation. Place your bin in an accessible location with drainage and some shade protection from the harshest afternoon sun.
Two bins allow one to mature while you fill the other, providing a continuous supply of finished compost. For urban settings without outdoor space, balcony bins or indoor worm systems offer viable alternatives. Vermicomposting uses worms to process scraps quietly indoors year-round, requiring only a sealed container and consistent conditions between 55-77°F.
| Category | Do This | Avoid This | Reason |
|---|---|---|---|
| Greens | Add fruit scraps, vegetable peelings, fresh clippings | Add meat, dairy, or greasy foods | Meat and dairy attract pests and create odors |
| Browns | Layer dry leaves, cardboard, straw between greens | Use glossy or colored paper with heavy inks | Some inks contain harmful chemicals |
| Maintenance | Turn pile every 4-7 days with a pitchfork | Leave pile undisturbed for weeks at a time | Turning adds oxygen and distributes moisture |
| Moisture | Keep pile sponge-damp; water dry layers | Let pile become soggy or bone-dry | Both extremes halt microbial activity |
| Materials | Chop large scraps into 1-2 inch pieces | Add large chunks or whole items | Smaller pieces decompose faster |
What Not to Compost: Key Don’ts to Avoid Problems
Certain materials disrupt the composting process or create health and safety concerns. Meat, dairy, greasy foods, and cooked items attract pests, generate foul odors, and decompose far more slowly than plant-based materials. The EPA explicitly advises against adding these items to home compost systems. Beyond the mess, these foods can introduce pathogens that survive even hot piles.
Weeds with mature seeds present another challenge. Unless your pile reaches temperatures of 130-160°F—hot enough to kill seed viability—the seeds may survive and spread when you apply the finished compost. Similarly, diseased plants should be composted only in high-heat systems or disposed of through other means to prevent reinfection of your garden.
Pet Waste and Other Materials to Exclude
Pet waste from dogs or cats contains pathogens harmful to humans and should never enter home compost bins. This includes both solid waste and kitty litter, regardless of how well your bin heats up. Manure from herbivorous animals like horses or chickens can work in some systems but requires careful handling and typically higher temperature management.
Treated or painted wood, chemicals, and synthetic materials do not belong in compost. Pressure-treated lumber contains preservatives that can leach into your soil, while paint and stain residues create toxic conditions. Plastic, glass, and metal obviously cannot decompose and contaminate the finished product.
Never add meat, fish, bones, dairy products, oily foods, or pet waste to home compost bins. These materials attract rodents, flies, and other pests while creating strong odors. Cooked foods and greasy leftovers fall into this same category. Diseased plants and weeds with mature seeds should also be excluded unless your pile reliably reaches 130-160°F, which kills most pathogens and seed viability.
Common Composting Mistakes and How to Fix Them
Most composting problems trace back to a handful of recurring issues. Recognizing the signs early allows you to correct course before major complications develop. The “Take a Peak, Take a Whiff, Dig In” method from Apartment Therapy provides a practical troubleshooting framework: observe the pile’s appearance, smell for warning signs, and physically examine the center.
When Your Pile Smells Bad
Ammonia odors or general rot smell usually indicate too many greens or excessive moisture. The fix involves adding carbon-rich browns and increasing aeration through more frequent turning. Pet waste, meat scraps, or cooked foods can also cause persistent odors—remove these materials if discovered and consider starting fresh with a cleaner foundation.
When Decomposition Stalls
A pile that refuses to break down typically suffers from insufficient nitrogen, inadequate moisture, or lack of aeration. Dry, brown material that sits unchanged needs greens and water. Compacted piles lacking airflow benefit from turning and adding bulky browns like wood chips or straw. Cold weather naturally slows activity—insulating the pile or using a tumbler in a sheltered location helps maintain processing year-round.
Pest Problems
Flies, rodents, and other unwanted visitors indicate food waste sitting exposed on the pile surface. Always bury fresh scraps under several inches of brown material to mask the scent. Wire mesh with 1cm grid openings beneath and around bins prevents burrowing pests from accessing the contents. Secure lids on tumbler-style bins and avoid placing compost near fences where animals might investigate.
Smells like ammonia? Add browns and turn more. Pile too dry and slow? Add greens and water, then turn. Pile soggy and matted? Add browns and aerate more frequently. Pests appearing? Bury food deeper and secure all entry points with fine mesh. Winter slowdown is normal—avoid turning frozen piles to preserve remaining heat. The pile should resume actively once temperatures climb again.
Best Practices for Fast and Effective Composting
Speed in composting comes from creating ideal conditions rather than forcing the process. Regular turning introduces oxygen that aerobic bacteria need to multiply and process material efficiently. Moisture management ensures those organisms function without drowning or desiccating. The balance between greens and browns provides both the food and the structure these beneficial microbes require.
Heat development indicates active decomposition. Piles reaching 130-160°F process material fastest while killing weed seeds and pathogens. Hot climates naturally aid this process, but even temperate regions can achieve high temperatures through proper management. Tumbler systems often achieve faster results than static piles because they make frequent turning less labor-intensive.
Building and Maintaining Your Pile
Collect kitchen scraps daily in a small pail with a tight lid to prevent odors and fruit flies in your kitchen. Empty this into your main pile or bin regularly, always covering fresh material with browns. The covering technique serves dual purposes: it masks attractive scents and creates the layering structure that promotes even decomposition.
When adding fresh material, check moisture levels and add water if the mix appears dry. Push materials toward the center where temperatures run highest rather than leaving fresh additions on cooler edges. Every four to seven days, turn the entire pile thoroughly with a pitchfork or shovel, moving outer material to the center and breaking up any compacted sections.
Recognizing Finished Compost
Ready compost appears dark and crumbly with an earthy smell reminiscent of forest soil. No recognizable food scraps or garden materials should remain visible. The texture should feel fine and granular rather than chunky or fibrous. Once your compost reaches this stage, apply it to garden beds as soil amendment, spread as mulch around plants, or mix into potting soil for container gardens.
How Long Does Composting Take? A Month-by-Month Breakdown
Composting timelines vary considerably based on methods, materials, and climate conditions. According to Healthline’s composting guide, tumbler systems and frequently turned piles produce finished compost in weeks to a few months, while static backyard piles may require six months or longer.
- Week 1: Build your pile with alternating greens and browns, starting with a coarse brown base layer. Moisten as you layer. Initial heating begins as microbial activity ramps up.
- Weeks 2-4: Turn the pile every four to seven days. Monitor moisture and add water if material appears dry. The pile should reach peak temperatures during this phase.
- Months 2-3: Continue turning weekly. Materials become increasingly unrecognizable. The pile temperature gradually decreases as easily decomposed material is consumed.
- Months 4-6: Turn monthly and allow materials to fully integrate. The process naturally slows as available food sources diminish. Final curing occurs as microbiology stabilizes.
- Ready to use: Compost appears dark, crumbly, and earthy-smelling with no visible chunks. Screen through hardware cloth if you want a fine finished product.
Worm bins process material continuously at cooler temperatures, producing vermicompost throughout the year independent of outdoor conditions. The constant processing by red wigglers means scraps disappear within days rather than months, though the overall timeline to finished castings still spans several months.
What We Know for Certain and What Remains Unclear
The fundamental science of composting rests on well-established principles documented by organizations like the EPA and university extension services. The nitrogen-carbon ratio needed for healthy decomposition is firmly understood, as are the basic requirements for moisture, aeration, and temperature management. These facts form the foundation of reliable composting advice.
| Established Information | Variables and Uncertainties |
|---|---|
| Greens provide nitrogen; browns provide carbon and structure | Exact ratio varies by material density and pile size |
| Moisture levels should resemble a wrung-out sponge | Optimal moisture varies slightly by bin type and climate |
| Temperatures of 130-160°F kill pathogens and weed seeds | Time at temperature needed varies; not all piles reliably reach these levels |
| Turning introduces oxygen and accelerates decomposition | How often and when to turn has some flexibility |
| Meat, dairy, and pet waste should be excluded | Specific recommendations vary for manure from different animals |
Climate significantly affects composting speed and management requirements, though the underlying principles remain constant. In hot, humid regions, piles may require more frequent turning and moisture monitoring to prevent drying. Cold climates slow activity but rarely stop it completely unless piles freeze solid. Worm composting offers an advantage in these conditions, as indoor bins maintain consistent temperatures year-round.
Why Composting Matters for Your Garden and the Environment
Redirecting organic waste from landfills represents one of composting’s most significant environmental benefits. When food scraps and yard waste decompose anaerobically in sealed trash bags, they generate methane—a greenhouse gas far more potent than carbon dioxide. Home composting allows these materials to break down aerobically, releasing carbon dioxide instead and producing valuable soil amendment.
Finished compost improves soil structure, increases water retention, and provides slow-release nutrients to plants. Gardens using compost regularly require less synthetic fertilizer and experience fewer pest problems due to improved plant health. The beneficial microorganisms in compost also support root development and disease resistance.
Beyond the garden, composting connects people to natural cycles often hidden in modern life. Watching materials transform from recognizable scraps into rich, dark soil provides tangible feedback about environmental impact. Even apartment dwellers can participate through vermicomposting systems that fit under sinks or on balconies.
What the Experts Say About Composting Success
The EPA recommends maintaining a balance of nitrogen-rich greens and carbon-rich browns for optimal decomposition. Keeping the pile moist like a wrung-out sponge and turning it regularly creates the conditions for efficient processing.
According to composting guidance from Don’t Waste the Crumbs, collecting daily scraps and emptying them into your pile consistently prevents odor buildup and keeps decomposition continuous rather than sporadic.
The South Australian government’s environmental guide notes that alternating layers of greens and browns, with food scraps buried under 4-8 inches of brown material, represents the most effective approach to pest prevention and odor management.
Key Takeaways for Successful Composting
Success in composting comes down to balancing materials, managing moisture, and maintaining consistent aeration. The 2-3:1 ratio of browns to greens provides a reliable starting point, while monitoring pile conditions through the “Take a Peak, Take a Whiff, Dig In” approach helps catch problems early. Avoid meat, dairy, greasy foods, pet waste, and diseased plant material regardless of your bin type or climate.
Starting requires minimal equipment—a bin, pitchfork, and container for kitchen scraps represent the essentials. Build layers, keep moisture consistent, turn weekly, and exercise patience as nature completes its work. The reward is rich, dark compost that feeds your garden while reducing landfill burden and greenhouse gas emissions.
Those exploring related topics might find value in understanding Weeping Lilly Pilly – Care Pruning and Growing Guide for integrating compost into ornamental garden care, or What Is MSG – Safety, Uses and Myths Explained for exploring how household materials connect to broader environmental discussions.
Frequently Asked Questions
How do I start composting at home?
Choose a location with drainage and some shade. Build a pile at least 3x3x3 feet or use a bin. Layer browns and greens, starting with coarse twigs for the base. Keep moisture like a wrung-out sponge and turn every 4-7 days. Bury fresh food scraps under several inches of brown material.
What is the best compost ratio?
Aim for a 2-3:1 ratio of browns to greens by volume. Browns include dry leaves, cardboard, and wood chips. Greens include food scraps, grass clippings, and fresh garden trimmings. This balance provides enough nitrogen for microbial activity while ensuring proper aeration from carbon-rich materials.
How long does composting take?
Tumbler systems and frequently turned piles produce finished compost in 1-3 months. Traditional backyard piles require 2-6 months depending on materials, climate, and management. Worm bins process material continuously, though complete vermicompost still takes months to mature.
Can you compost meat or dairy?
Home compost bins should exclude all meat, dairy, and greasy foods. These materials attract pests, create strong odors, and can introduce pathogens. High-temperature commercial systems may process these items safely, but home composting lacks the necessary heat and control.
Why does my compost smell bad?
Bad smells usually indicate too many greens, excessive moisture, or the presence of prohibited materials like meat or dairy. Fix by adding browns, increasing aeration through more frequent turning, and ensuring no prohibited items are present. Persistent ammonia smells suggest overloading with fresh material.
Is it okay to compost weeds?
Weeds without mature seeds can be composted safely. Weeds with seeds or aggressive spreading roots should only be added if your pile reliably reaches 130-160°F—otherwise seeds may survive and spread when you apply the finished compost. Some perennial weeds may re-establish from root fragments even in hot piles.
What kills compost worms?
Temperatures above 77°F stress or kill red wigglers used in vermicomposting. Direct sunlight, freezing conditions, and overly wet or dry environments also harm worms. Avoid meat, dairy, citrus, and spicy foods that can create unfavorable conditions. Keep worm bins in temperature-controlled spaces like garages or indoor corners.
Related stories





Liam O'Brien covers Australian politics and public affairs for Coast Monitor.